How to draw a Line in SwiftUI
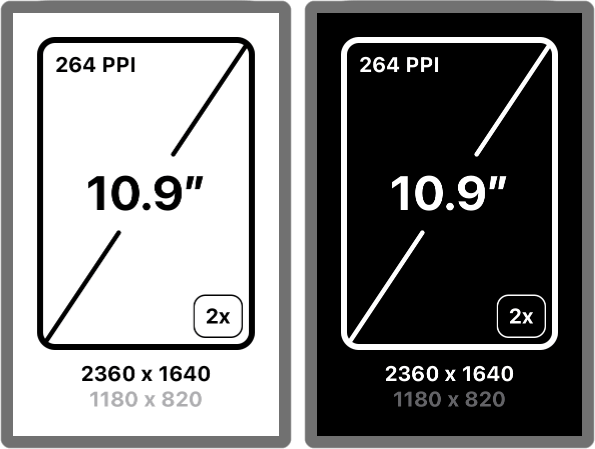
stroke using Path, Shape and InsettableShape.I wanted to build a component in SwiftUI that would represent the screen of a device allowing you to see its diagonal, resolution etc. in a nice visual way. Here’s how everything will look in the end.
-

- This is what we are building as whole. This particular screen represents a 5th Generation iPad Air.
The outer line is just a Rectangle or a RoundedRectangle depending on the device. What we are going to look at in this post is how to draw the diagonal line.
Drawing in SwiftUI means that you very likely want to use a Path. It is a low level struct that you give instructions how to draw like so for a diagonal line in a 100x100 square:
var path = Path()

// `move` without drawing
path.move(to: CGPoint(x: 0, y: 100))
// `draw` a line
path.addLine(to: CGPoint(x: 100, y: 0))
Of course we don't want to hardcode the size we are drawing inside of. This is where Shape comes into play. Shape is a protocol (that also conforms to the View protocol so it can be used anywhere a View is needed) that has a simple requirement (The aforementioned Rectangle and RoundedRectangle are Shapes too):
func path(in: CGRect) -> Path
meaning: return me a path given this Rectangle to draw in. So let's do that.
struct ScreenDiagonalLine: Shape {
    func path(in rect: CGRect) -> Path {
        var path = Path()

        // `move` to the left bottom ((0,0) is at the left top)
        path.move(to: CGPoint(x: rect.minX, y: rect.maxY))
        // `draw` a line to the right top
        path.addLine(to: CGPoint(x: rect.maxX, y: rect.minY))

        return path
    }
}
Ok, much better. No more hardcoded numbers. Now let's use this new Shape of ours in a view. Shape's on their own don't draw until you tell them to either fill the shape or to add a stroke. Since our shape can not be filled we will use stroke.
struct ScreenView: View {
    var body: some View {
        ScreenDiagonalLine()
            .stroke(.black, lineWidth: 4)
    }
}
The interesting thing about stroke is that the width of the line is half inside the shape and half outside the shape. So now you will draw outside of the bounds of the shape and that means if you for example use the .clipped modifier on the shape or the shape fills the whole screen you will cut right throught the middle of your stroke. That's generally not what you want.
InsettableShape to the rescue
InsettableShape is (you guessed it) another protocol. And once again one with a simple requirement:
func inset(by: CGFloat) -> Self.InsetShape
The system will call your shape and tell it by which amount the path will need to be inset. Since this happens outside of the drawing lifecycle you will need to hold on to that value so that you can use it when doing the actual drawing. So let's add that code to our existing ScreenDiagonalLine shape.
struct ScreenDiagonalLine: InsettableShape {
    var insetAmount: CGFloat = 0

    func inset(by amount: CGFloat) -> Self {
        var line = self
        line.insetAmount += amount
        return line
    }

    func path(in rect: CGRect) -> Path {
        var path = Path()

        // We need to take into account `insetAmount` here
        path.move(to: CGPoint(x: rect.minX + insetAmount, y: rect.maxY - insetAmount))
        // and here
        path.addLine(to: CGPoint(x: rect.maxX - insetAmount, y: rect.minY + insetAmount))

        return path
    }
}
But even now that we have adopted the InsettableShape protocol our border will still be cut off. The last step to fix that is to update the .stroke modifier to the .strokeBorder modifier.
struct ScreenView: View {
    var body: some View {
        ScreenDiagonalLine()
            .strokeBorder(.black, lineWidth: 4)
    }
}
Conclusion and full code example
I personally found this topic very interesting mostly because it shows how much detail there is even in the tiniest things. Before this it never even occured to me that stroking a shape would have this much nuance. Do you draw the border inside, centered or outside of the shape? And how does that decision affect your layout when the shape fills the whole screen / is clipped?
Initially I found SwiftUI's handling of this a little weird, now though I can see that this was mostly because I wasn't event aware of the problem space. It still feels a bit unintuitive but once you know how it works you can fine tune the behaviour exactly as you want it.
To round this off, here is the full code for the screen diagonal line I outlined (no pun intended) at the beginning of this post.
struct ScreenDiagonalLine: InsettableShape {
    /// The gap in relation to the longest side to leave empty
    private let midAreaGap: CGFloat
    private let cornerRadius: CGFloat

    var insetAmount: CGFloat = 0

    func inset(by amount: CGFloat) -> Self {
        var line = self
        line.insetAmount += amount
        return line
    }

    init(midAreaGap: CGFloat, cornerRadius: CGFloat = 0) {
        self.midAreaGap = midAreaGap
        self.cornerRadius = cornerRadius
    }

    func path(in rect: CGRect) -> Path {
        let inset = cornerRadiusInset + insetAmount
        let startPoint = CGPoint(x: rect.minX + inset, y: rect.maxY - inset)
        let gapStartPoint = CGPoint(
            x: rect.midX - (midAreaGap * 0.5 * rect.maxX),
            y: rect.midY + (midAreaGap * 0.5 * rect.maxY)
        )
        let gapEndPoint = CGPoint(
            x: rect.midX + (midAreaGap * 0.5 * rect.maxX),
            y: rect.midY - (midAreaGap * 0.5 * rect.maxY)
        )
        let endPoint = CGPoint(x: rect.maxX - inset, y: rect.minY + inset)

        return Path { path in
            path.move(to: startPoint)
            path.addLine(to: gapStartPoint)
            path.move(to: gapEndPoint)
            path.addLine(to: endPoint)
        }
    }

    var cornerRadiusInset: CGFloat {
        //this approximation is close enough
        let sqaureRootOfTwo = 1.414213
        return (sqaureRootOfTwo * cornerRadius) - cornerRadius
    }

    func longSideLength(rect: CGRect) -> CGFloat {
        max(rect.maxX, rect.maxY)
    }
}